The Overglow Edit nail art tutorial: Mix & Match Mani
19 June 2023 – 4 min read
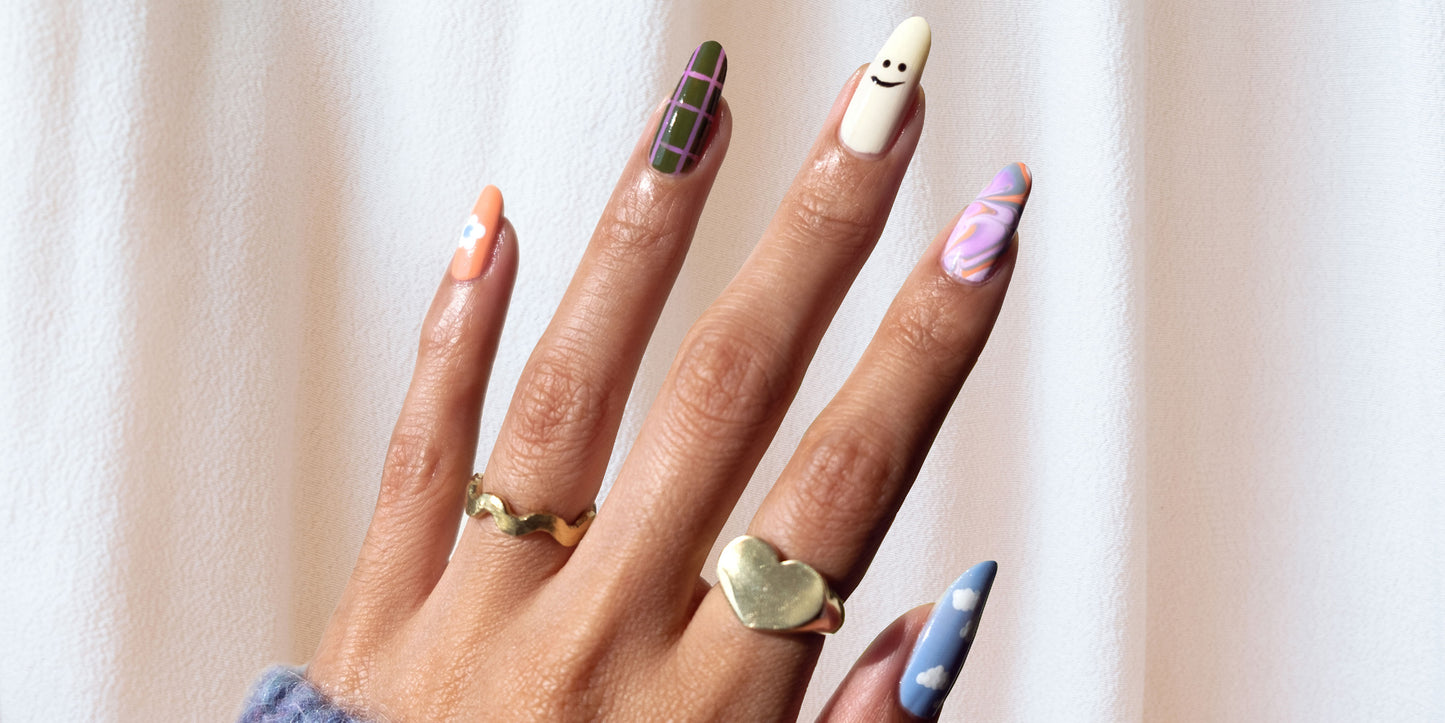
Prep yourself for the party mix of manicures; five flavours that you didn’t think would work together, but totally do. This smiley, stripey and swirly blend comes to you in our final instalment of summer nail art by Melanie Graves of the Overglow Edit. Wear them together in a delicious assortment, or individually as feature nails in their own right - the sky’s the limit.
What you will need
- Cotton pads and Kester Black Nail Cleanser
- Kester Black Miracle Treatment Base Coat
- Kester Black Nail Polish in French White, Skinny Dip, Impeachment, Violet, Daisy Chain, Black Rose, and Jungle Gymnast
- Kester Black Supersonic Top Coat
- Kester Black Self Love Oil
- A Kester Black Nail Polish Remover of your choice
- A glass of water (for your nails)
- A dotting tool
- A thin tipped nail art brush
- A cotton bud
- Striping tape
Tool tip:
Some of these styles require a couple of nail tools. Good thing we’ve put together a little guide to crafting these from items commonly found around the house:
- Make a fine-tipped nail brush from a regular paint brush by snipping off some bristles, dipping them in a top coat and securely taping them at one end after they’ve dried. Tape this to a pen or pencil for mobility and away you go.
- Toothpicks make a great pointed tip in the absence of dotting tools.
- Pacers or mechanical pencils (high tech stuff) make great lining and dotting tools, but require some extra TLC due to their fragility.
Prep Work
Set your nails up for long-lasting success by cleansing and filing them before painting. This look works on nails of all shapes and sizes, but if you’re keen to file yours into a particular formation, check out our guide to finding the most flattering shape for your hands. Even if they’re polish-free, cleansing your nails prevents premature chipping or flaking. Glide a cotton pad soaked in nail cleanser over each fingernail before painting.
Apply a thin layer of your chosen base coat to each nail and allow to dry for approximately five-minutes. We’re partial to the award-winning Miracle Treatment Base Coat; a formula that acts as a primer for your colour and a nourishing treatment for your nails.
1. Cloudy Skies

We’ve created this daydreamy look with Skinny Dip and French White. Apply a coat of Skinny Dip to each nail and allow to dry for five minutes. Apply a second coat before gently dotting on little clusters of clouds with a nail dotting tool. We like to treat these like little asymmetrical pyramids; starting with smaller dots at the bottom that gradually taper off towards the top.
2. Mini Marble

You’ll need a glass of water and cotton bud to help you create this look. Start by adding a drop of each nail polish to the glass of water (we’ve used Impeachment, Lilac and Skinny Dip), making sure that each drop sits in the center of the last, like a bullseye. Dip your fingertip into the floating polish and gently remove. The colours should appear marbled when you lift your finger out of the water. Allow to dry before removing the excess polish from around your nail with a cotton bud dipped in nail polish remover.
3. Smiley Face

This look requires a dotting tool and a thin-tipped nail art brush (please see our tool tips for suggested substitutes). Apply two coats of Daisy Chain to your nail, allowing each coat to dry for five minutes. Using a dotting tool dipped in Black Rose, paint two small dots for eyes. Then take a thin-tipped nail art brush, also dipped in Black Rose, and paint on a little curved smile.
4. Gridlock

This look requires striping tape to help create the grid look. However, you can fake it till you make it with a thin-tipped nail art brush and really steady hands. (We have our fingers crossed for you.) Apply a thin coat of Violet to your nail and allow it to dry completely. Once your nails are totally touch-dry, apply a few strips of nail striping tape to your finger in a grid formation. Apply a coat of Jungle Gymnast over the top and allow to dry. Once dry, gently peel away the nail striping tape.
5. Itty Bitty Bloom

This little flower can be created with a dotting tool (or a pencil or toothpick). Apply a coat of Impeachment to your nail and allow to dry for five minutes. Taking a dotting tool dipped in French White, paint five tiny dots in petal formation. Then taking a dotting tool dipped in Skinny Dip, paint a single dot in the center of the white dots - voila.
Finishing Touches
No look is truly complete without a top coat. Apply top coat to each nail and allow to dry. We recommend our Supersonic Top Coat as it dries in 90-seconds flat, reducing the likelihood of you smudging your Mix & Match masterpiece. Once you’re touch-dry, apply a drop of Self Love Oil to your cuticles for maximum hydration.
And if you’re looking to lengthen and strengthen your nails first, then you might want to read our Nail Care 101 blog on nursing naughty nails back to good health.
Show us how you’ve brought this look to life by tagging us in your latest nail creations @kesterblack or using #kesterblack.
